
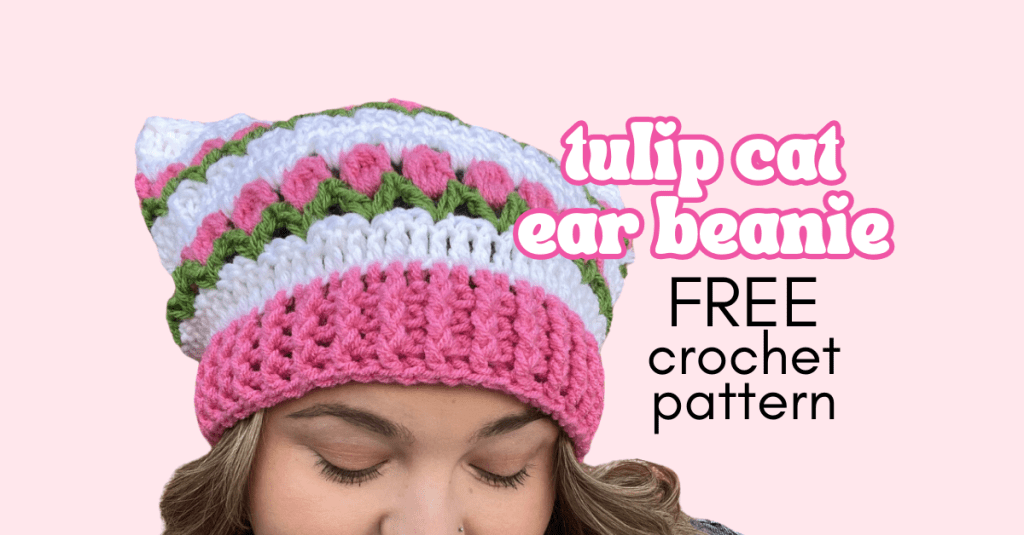
Looking for the perfect free hat pattern that’s different from the rest? You’ve come to the right place! If you can double crochet, you can make this hat—seriously! The Tulip Cat Ear Beanie is a beginner-friendly crochet project that works up quickly, making it perfect for last-minute gifts or a fun weekend project.
I absolutely love how the little tulips pop against the background, and the color combinations are endless—go classic with pink and green, bold with neon brights, or moody with deep jewel tones.
This pattern is also available as a PDF on my Etsy store. Feel free to download there if you’d like to support me! Grab your yarn and hook, and let’s get stitching! 🌷

Tulip Cat Ear Beanie Crochet Pattern
Materials Needed
- 3 skeins of Loops & Threads Soft Classic Solid Yarn (or your preferred worsted weight yarn) in white, green, and pink (or your preferred colors!)
- 5.0mm crochet hook
- Scissors
- Darning needle
Sizing Information
- This hat is made to fit an adult medium, or 22 in head circumference. If you’d like to make your hat bigger or smaller, simply chain more or less stitches to start, making sure your total stitch count is a multiple of 3 + 1.
- Final hat measures 7.5 x 10.5 in when laid flat.
- gauge: 11 stitches = 4 inches, 6 rows = 4 inches in double crochet
Abbreviations (US Terms)
- Ch = chain
- Dc = double crochet
- Ss = slip stitch
- Fpdc = front post double crochet. (Yarn over, insert your hook from front to back to front around the post of the next stitch, yarn over, pull up a loop, yarn over, pull through 2 loops on your hook, yarn over, pull through remaining two loops on your hook)
- Bpdc = back post double crochet. (Yarn over, insert your hook from back to front around the post of the next stitch, yarn over, pull up a loop, yarn over, pull through 2 loops on your hook, yarn over, pull through remaining two loops on your hook)
- Pc = popcorn stitch. *Yarn over, pull up a loop, pull through 2 loops.* repeat 5 times, then pull through all 6 loops.
Hat Body
Note: the Ch2 at the beginning of each round does NOT count as a stitch.
Ch 70 in white. Ss to first chain, creating a circle. Be sure not to twist the chain! Working in the round:
R1: Ch2, dc in each chain space. Change to green and ss to first stitch of row. (70)
R2: In green, ch4. Dc in first stitch, skip 2 stitches. Repeat *dc, ch2, dc in same space, skip 2 stitches* until end of row. In last stitch, dc, ch2, dc. Change to pink and ss in first stitch of row. (70)
R3: In pink, ch2. In each ch2 space, pc and ch2. (see abbreviations). In last stitch, pc and change to white, then ss in first stitch of row. (70)
R4: In white, ch2. 1dc in the top of the first pc, then 2dc in the ch2 space. Repeat *1dc in top of pc, 2dc in ch2 space* until end of row. Ss to first stitch of row. (70)
R5: Ch2. Dc in each stitch around. (70)
R6: Repeat row 2
R7: Repeat row 3
R8: Repeat row 4
R9: Ch2. Dc in each stitch around (70)
Finish off, leaving a long tail to sew the top closed.
Hat Brim
Turn your work upside-down so that you’re working on the other side of your starting chain. With pink yarn, attach to the stitch to the right of your yarn tail from the first row.
R1: Ch2, 1dc in each stitch along the bottom of the hat. (70)
R2: Ch2, fpdc in first stitch, bpdc in next stitch. Repeat *fpdc, bpdc* until end of row. Ss to first stitch of row. (70)
R3-5. Repeat row 2
Finish off.
Finishing Touches
Using the long tail left from crocheting the body, sew the top of your hat closed. Weave in ends, and enjoy your new hat!
I can’t wait to see your Tulip Cat Ear Beanie in all its colorful glory! If you make one, be sure to share it on Instagram or Threads and tag me @ewwgirlgerms—I’d love to hype up your finished work! 🌷
NOTE: Feel free to sell finished hats made from this pattern, but please give design credit to me, Hailey at Girl Germs, and link my site when appropriate.


Leave a comment